RAPTOR-AI Project -- RARiS, Tohoku University
Radiation Protection Toolkit for Radioisotopes with Artificial Intelligence (RAPTOR-AI)
by: Research Center for Accelerator and Radioisotope Science (RARiS)
Tohoku University
A free and open-source AI model coupled with PHITS Monte Carlo package.
The current model incorporates deep learning object detection using our proprietary trained models. This advanced approach enables the simulation of human phantom movement and the generation of various slab shielding materials through straightforward 2-dimensional markup images. By employing different colors, users can quickly and easily model a variety of shielding materials, allowing for rapid and efficient scenario creation and analysis. This innovation streamlines the process of visualizing and assessing the effectiveness of different shielding configurations, making it both accessible and highly efficient for diverse applications in radiation protection and safety.
Additionally, we have developed and integrated a custom code editor and image viewer within the program. This robust feature allows users to upload maps with designated human locations, facilitating comprehensive radiation protection studies for various common radioactive sources. Users can easily visualize and analyze potential radiation exposure scenarios, leveraging the power of our advanced tools to enhance the accuracy and depth of their safety assessments. This all-in-one solution streamlines the workflow, enabling detailed and user-friendly evaluations of radiation protection measures in diverse environments.
RAPTOR-AI offers an intuitive platform for both novice and experienced users to model radiation transport, interaction, and dispersion within a 3-dimensional coordinate system, including detailed human organ structures. Leveraging the powerful PHITS Monte Carlo package, RAPTOR-AI eliminates the need for users to write any code, making advanced radiation simulations accessible and user-friendly. With RAPTOR-AI, users can effortlessly explore complex radiation phenomena and obtain precise results without any programming expertise.
Key Highlights of RAPTOR-AI Model:
- User-Friendly Interface: RAPTOR-AI requires no coding skills, making it accessible for both novice and experienced users to conduct advanced radiation simulations effortlessly.
- Advanced Deep Learning Object Detection: Incorporates proprietary trained models for accurate human phantom movement and slab shielding material generation using simple 2-dimensional markup images.
- Custom Code Editor and Image Viewer: Integrated tools allow users to upload maps with marked human locations, enhancing the ability to perform detailed radiation protection studies.
- Versatile Shielding Material Modeling: Swiftly model different shielding materials by using various colors, enabling rapid scenario creation and analysis for effective radiation protection planning.
- Comprehensive Radiation Transport Simulation: Utilizes the powerful PHITS Monte Carlo package to model radiation transport, interaction, and dispersion in 3D coordinates with human organs, providing precise and reliable results.
Developers:

Dr. Mehrdad S. Beni is a research fellow at Tohoku University, Japan. He has a Ph.D. in Physics from City University of Hong Kong. His interests are nuclear physics, radiation physics and computational physics.
Prof. Hiroshi Watabe is a professor at Tohoku University, Japan. He received Ph.D. in nuclear engineering from Tohoku University. He has been in Division of Radiation Protection and Nuclear Safety Research Center for Accelerator and Radioisotope Science, Tohoku University, Japan. Since 2015, he has been a professor. His research interest includes nuclear medicine physics, nuclear engineering in medicine and radiation dosimetry.
This project has been significantly enhanced by the expertise and dedication of several key collaborators:
- Prof. Tatsuhiko Sato -- Nuclear Science and Engineering Center, Japan Atomic Energy Agency, 2-4 Shirakata, Tokai, Ibaraki 319-1195, Japan
- Prof. Peter K.N. Yu -- Department of Physics, City University of Hong Kong, Tat Chee Avenue, Kowloon Tong, Hong Kong
- Prof. Dragana Krstic -- Faculty of Science, University of Kragujevac, R. Domanovica 12, 34000, Kragujevac, Serbia
- Prof. Dragoslav Nikezic -- Faculty of Science, University of Kragujevac, R. Domanovica 12, 34000, Kragujevac, Serbia
- Prof. Kyeong Min Kim -- Korea Institute of Radiological & Medical Sciences, 75, Nowon-ro, Nowon-gu, Seoul, Korea
- Prof. Taiga Yamaya -- National Institutes for Quantum Science and Technology, Anagawa 4-9-1, Inage-ku, Chiba-shi, Chiba 263-8555, Japan
- Prof. Naoki Kawachi -- National Institutes for Quantum Science and Technology, 1233 Watanuki, Takasaki, Gunma 370 1292, Japan
- Prof. Hiroki Tanaka -- Institute for Integrated Radiation and Nuclear Science, Kyoto University, 2-1010 Asashiro-Nishi, Kumatori-cho, Sennan-gun, Osaka 590-0494, Japan
- Prof. A.K.F. Haque -- Atomic and Molecular Physics Laboratory, Department of Physics, University of Rajshahi, Rajshahi 6205, Bangladesh
- Dr. Zoran Jovanovic -- State University of Novi Pazar Department of Natural Science and Mathematics Vuka Karadzia 9 36300 Novi Pazar, Serbia
- Dr. M. Rafiqul Islam -- Institute of Nuclear Medical Physics, AERE, Bangladesh Atomic Energy Commission, Dhaka, 1349, Bangladesh
- Prof. Gary Tse -- School of Nursing and Health Sciences, Hong Kong Metropolitan University, Hong Kong
User Manual
Here is a detailed guide on how to use RAPTOR-AI, including the necessary prerequisites for a successful deployment of the model:
- Operating System Requirements -- The present model was developed and tested on Ubuntu 22.04 and Debian 12 (Bookworm) GNU/Linux operating system.
- Python version -- The present model was developed and tested using Python 3.10.12.
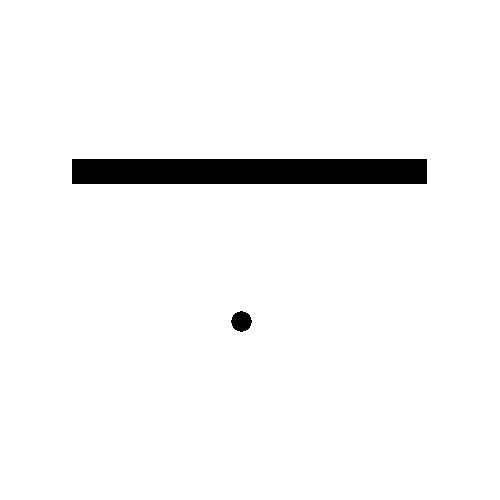
- 2-dimensional markup image preparation -- Users can create their 2D markup images using the free and open-source software, GIMP. To represent the positions of the human phantom and shielding material, solid dots and solid rectangles can be used. An example illustrating the human position and a shield is shown in Figure 1 below.
- GIMP tutorial 1 -- download and install GIMP program (https://www.gimp.org/).
- GIMP tutorial 2 -- create a new image canvas by navigating to "File" > "New" or simply use "Ctrl+N", you will see the following shown in Figure 2 below.
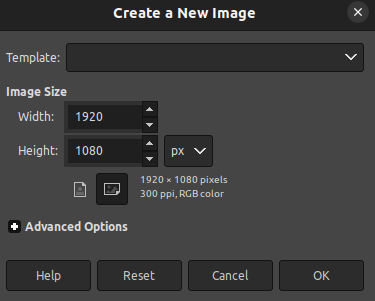
- GIMP tutorial 3 -- Image Size shown in the above figure, directly determines the modelling domain. For example, setting "Widht" and "Height" to 500 and 500, respectively determines the simulation domain to be 500 cm by 500 cm. The present program uses image size to define the size of the modelled domain. Note, in the program GUI user can only scale-up their loaded images by a multiple of integer number.
- GIMP tutorial 4 -- Now setting width and height to 500 px and then click on "Ok" button in GIMP. you will see the following shown in Figure 3 below.
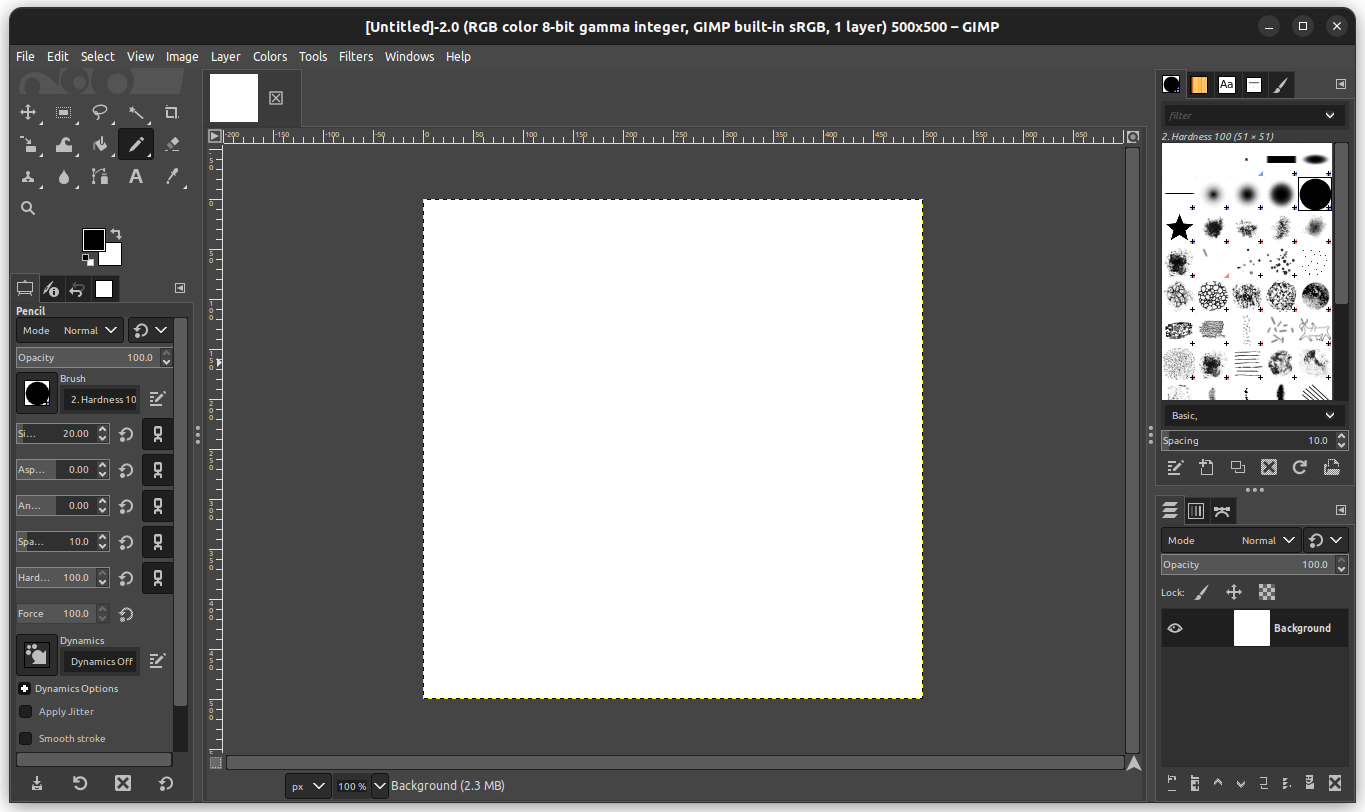
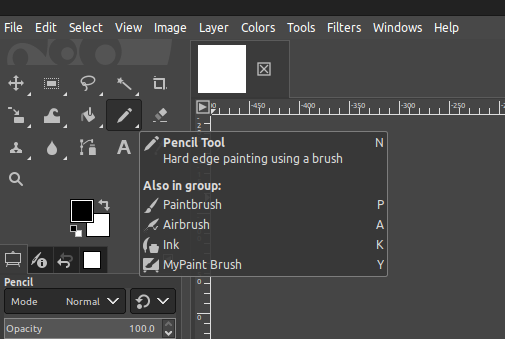
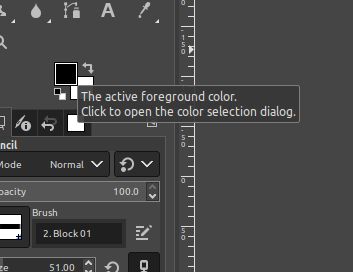
- GIMP tutorial 5 -- Select "Pencil Tool" from the left top corner in GIMP, as shown in Figure 4 below.
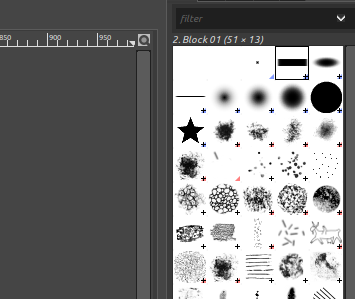
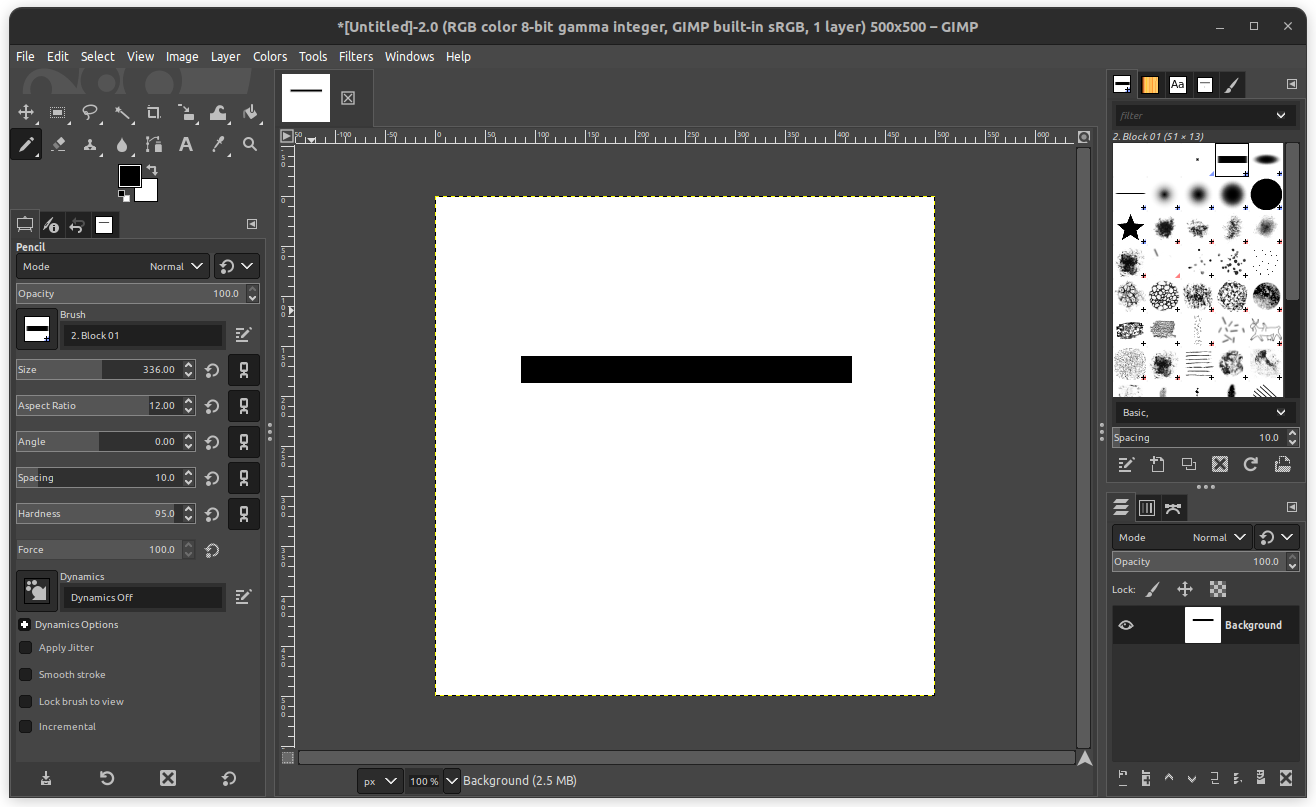
- GIMP tutorial 6 -- Select a brush style from right top corner in GIMP. Here we will use the rectangle brush to draw shield, as shown in Figure 5 below.
- GIMP tutorial 7 -- Select pencil color in GIMP by setting the foreground color (please ensure the background of the image is white), as shown in Figure 6 below.
- GIMP tutorial 8 -- Select color in GIMP by using the color selector. For example the HTML notation of black color is 000000, as shown in Figure 7 below.
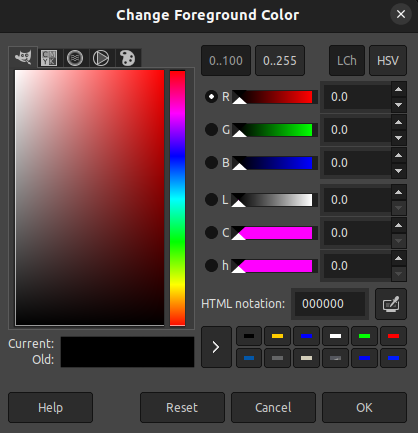
Note color shades are not preferred. For black use 000000. For blue use 0000ff. For red use ff0000. For green use 00ff00. These will ensure you have pure black, blue, red and green colors.
- GIMP tutorial 9 -- The only parameter that you must change is the "Size" and the "Aspect Ratio" of your pencil tool. This is to change the size and orientation of the pencil tool for drawing shields, as shown in Figure 8 below. NOTE: only ONE single click draw must be done to ensure the drawn rectangle is fully straight.
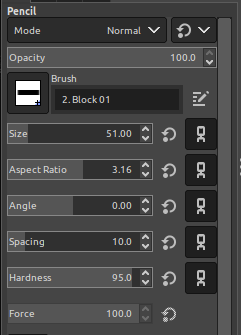
- GIMP tutorial 10 -- The drawn rectangle with example "Size" and "Aspect Ratio" is shown in Figure 9 below.
- GIMP tutorial 11 -- The next step is to define human phantom location in the modelled domain which in this case is the image canvas. For this case, the same pencil tool must be used, the only change woudld be to use the circular pencil/brush style with 100% hardness, as shown in Figure 10 below.
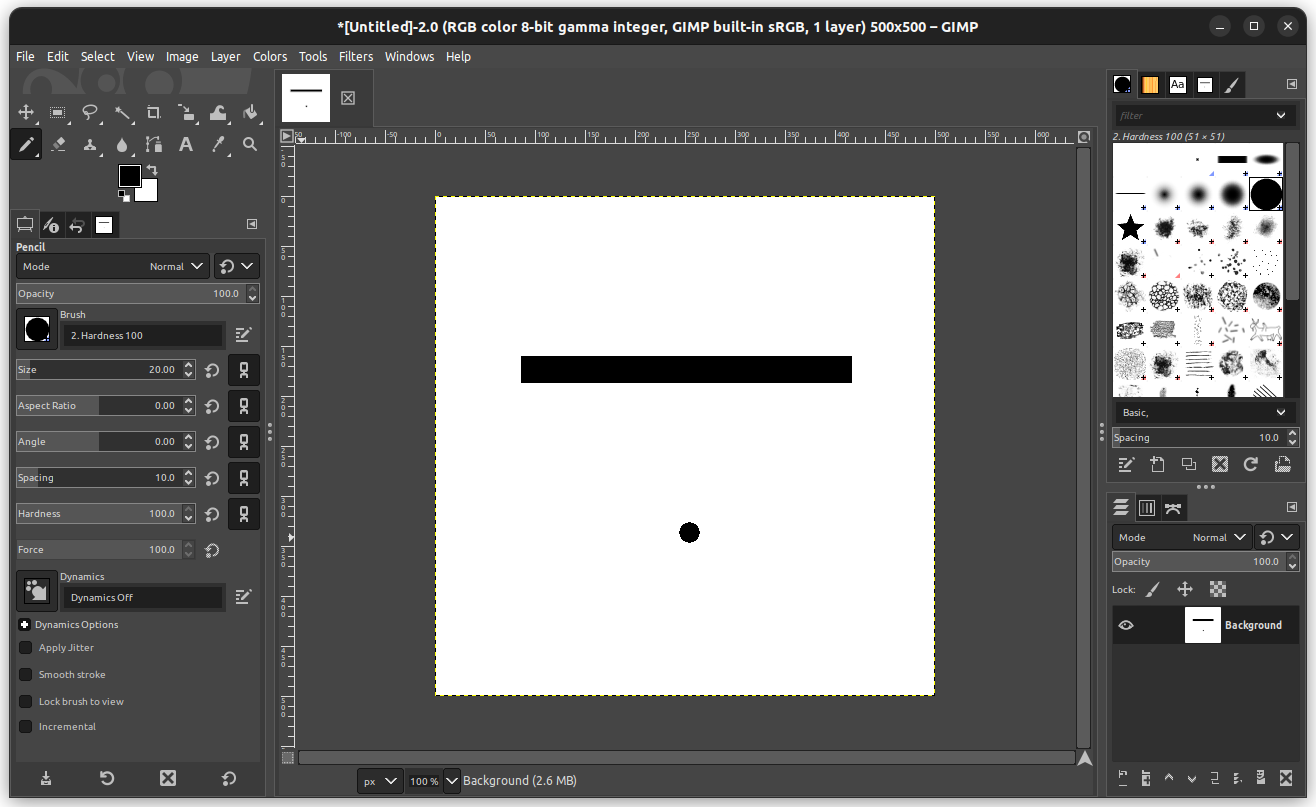
Note human phantom location must be only circular with 100% hardness and only black color. Make sure the size of the drawn solid circle is not too small and also not too large, for example as shown in figure 10, for a 500 cm x 500 cm domain the tool size was set to 20.00 px.
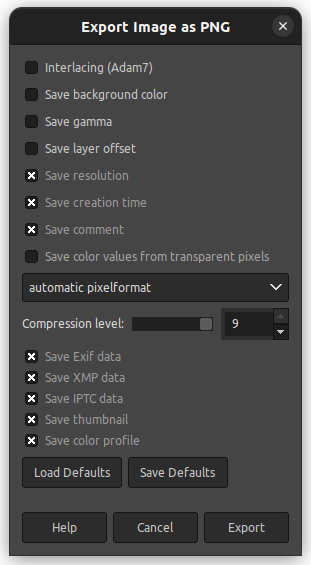
- GIMP tutorial 12 -- Once you are satisfied with your markup image, you can now export your 2D markup image in png format. Navigate to File > Export As.... Then set a name for your image for example img1.png. Click on Export, you will see another dialog for export setup (see Figure 11), just click on Export button.
It needs to be noted that different shield color represent differeny materials in the RAPTOR-AI model. We have set black color rectangles to represent lead slab shields, blue color rectangles to represent concrete slab shields, red color rectangles to represent polyethylene slab shields and green rectangles to represent custom user-defined slab shields.
-----------------------------------------------------------------------
------------------------------------------------------
------------------------------------------
The step-by-step tutorial for using RAPTOR-AI on Ubuntu 22.04 GNU/Linux operating system using terminal built in operating system
- RAPTOR-AI step 1 -- On your Linux machine make sure the system packages are updated. On Debian-based systems (here we focus on Ubuntu 22.04) use:
sudo apt update and sudo apt upgrade -- these command will updated your system packages.
- RAPTOR-AI step 2 -- Install python and required packages by using:
sudo apt install python3 python3-pip python3-tk python3-pil python3-pil.imagetk python3-venv
- RAPTOR-AI step 3 -- If you wish to use a virtual environment (venv) which is required by newer distros but for our current case it is not required (optional):
python3 -m venv .venv
source .venv/bin/activate
- RAPTOR-AI step 4 -- Install git and clone the RAPTOR-AI repository that contains the latest source code:
sudo apt install git -- this command install git
git clone https://github.com/msbCyricTohoku/RAPTOR-AI -- this command clones Tkinter version of RAPTOR-AI
git clone https://github.com/msbCyricTohoku/RAPTOR-AI-Qt -- this command clones Qt version of RAPTOR-AI
Here you can choose to use the Tkinter version GUI which has a simple and minimal look and feel or if you wish to have a more modern look and feel you can use the Qt version of RAPTOR-AI.
********************************************************
In case of choosing Qt version, additional libraries and packages must be installed, use the following to install them:
python3 -m pip install PyQt6 or pip install PyQt6
pip install pyqt6==6.4.2
pip install pyqt6-qt6==6.4.2
pip install PySide6
Note: for the Qt version, we have noticed it will work better with wayland rather than xorg. Please switch if needed.
********************************************************
Please note that we will focus on the Tkinter version of the RAPTOR-AI here, operations would be similar to the Qt version.
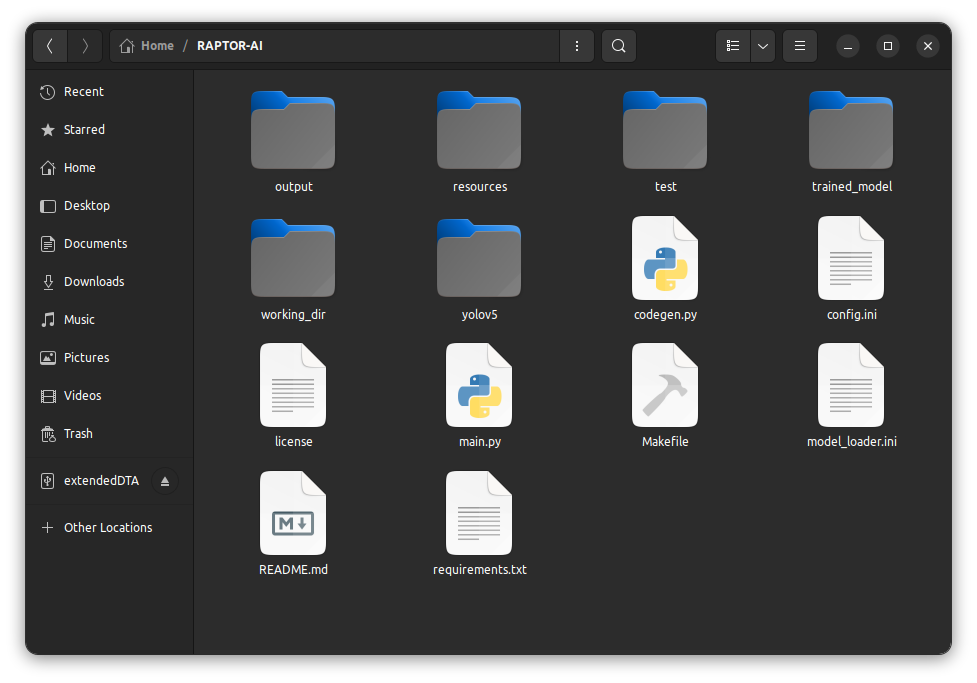
- RAPTOR-AI step 5 -- After cloning the RAPTOR-AI Tkinter version repository and soure code, for example in your home folder, navigate to the folder by using:
cd RAPTOR-AI -- this command changes user directory
The program directory would be as shown in Figure 12 below:
- RAPTOR-AI step 6 -- Now we will install dependencies that is needed by RAPTOR-AI by using:
make install -- this command this installs all the dependencies (see Figure 13)

Please note that if make command is not installed on your system, just install it by sudo apt install make
- RAPTOR-AI step 7 -- Now we will run the RAPTOR-AI program by using (see Figure 14):
make -- this command runs RAPTOR-AI
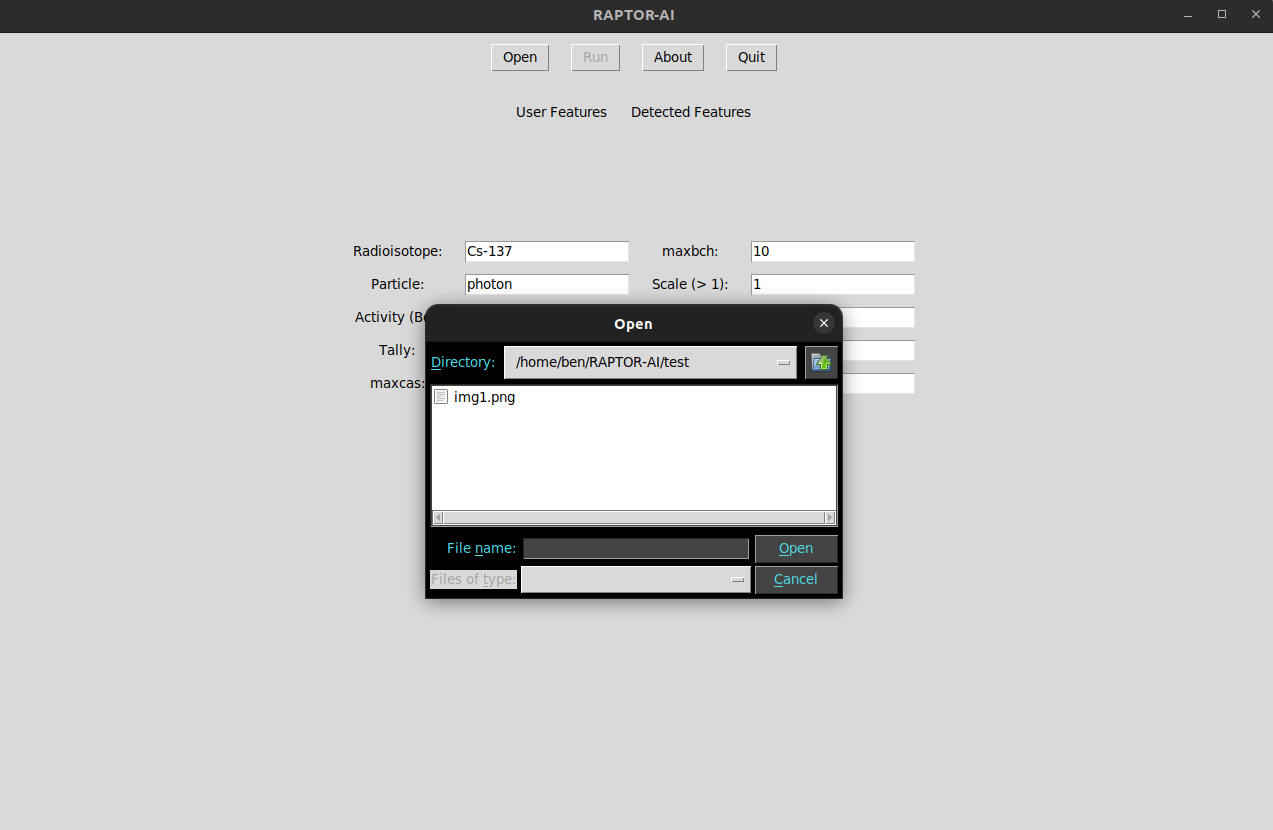
- RAPTOR-AI step 8 -- Now we will open the image that we have created in previous step. We recommend to place the generated PNG image from GIMP under test folder in the program directory click on Open and open the image file (see Figure 15):
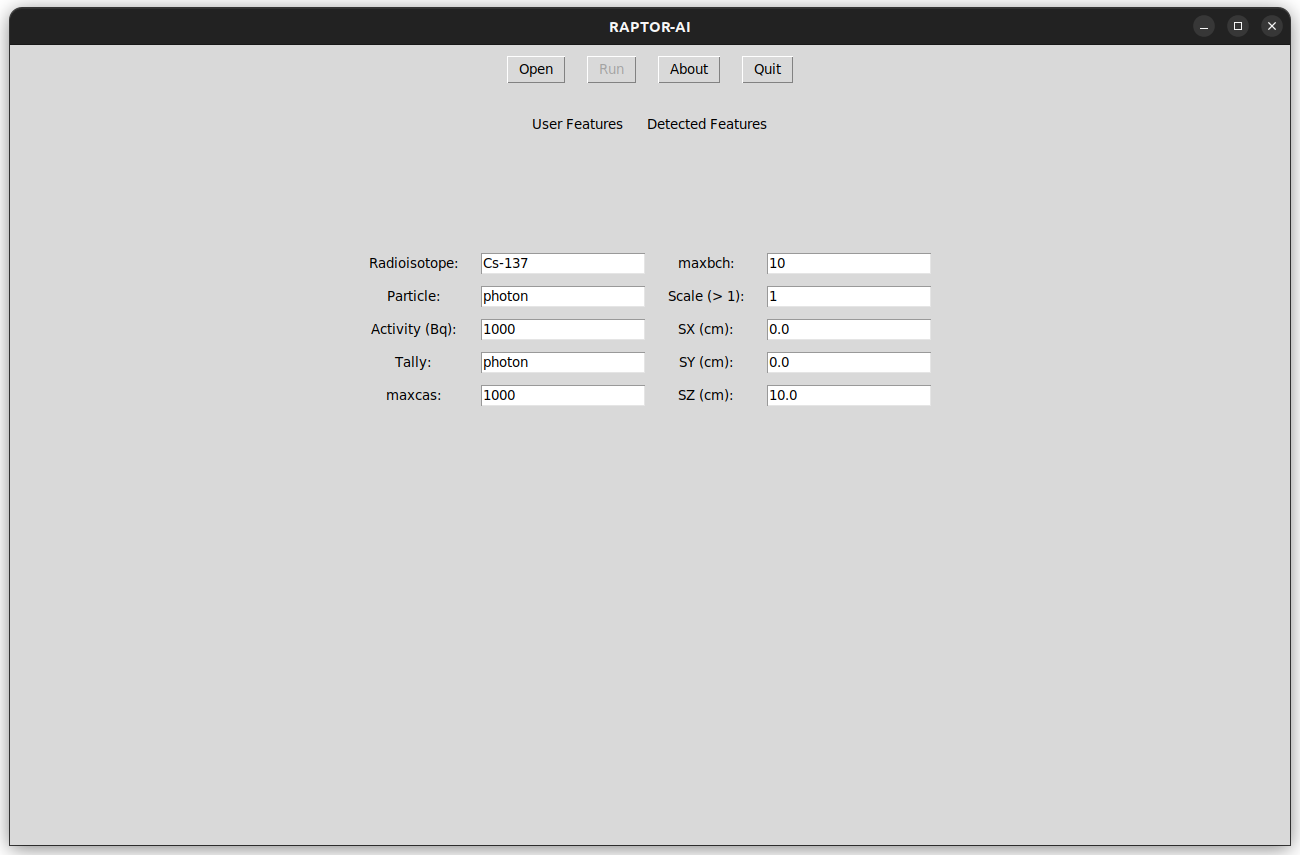
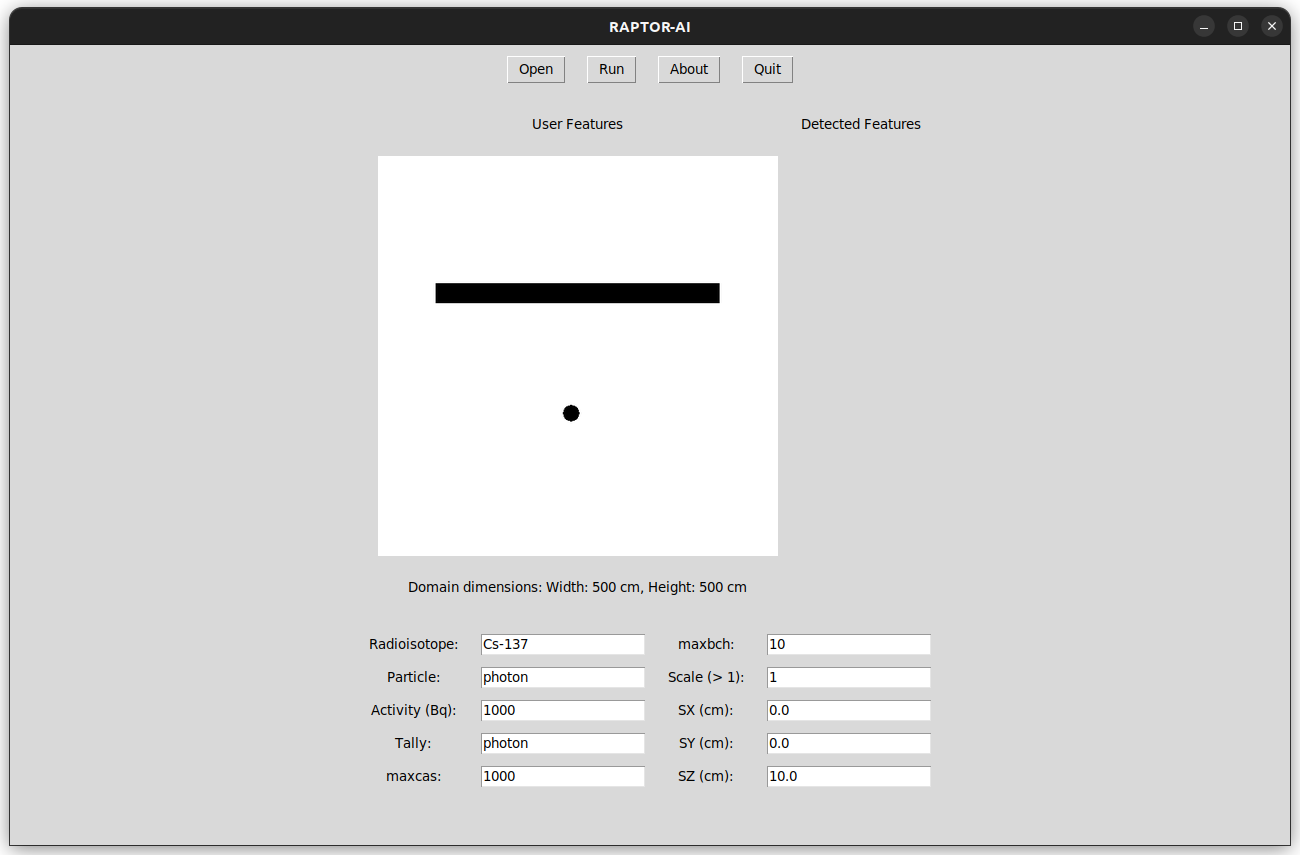
- RAPTOR-AI step 9 -- Once the image is loaded into the RAPTOR-AI program it must be shown on the GUI (see Figure 16).
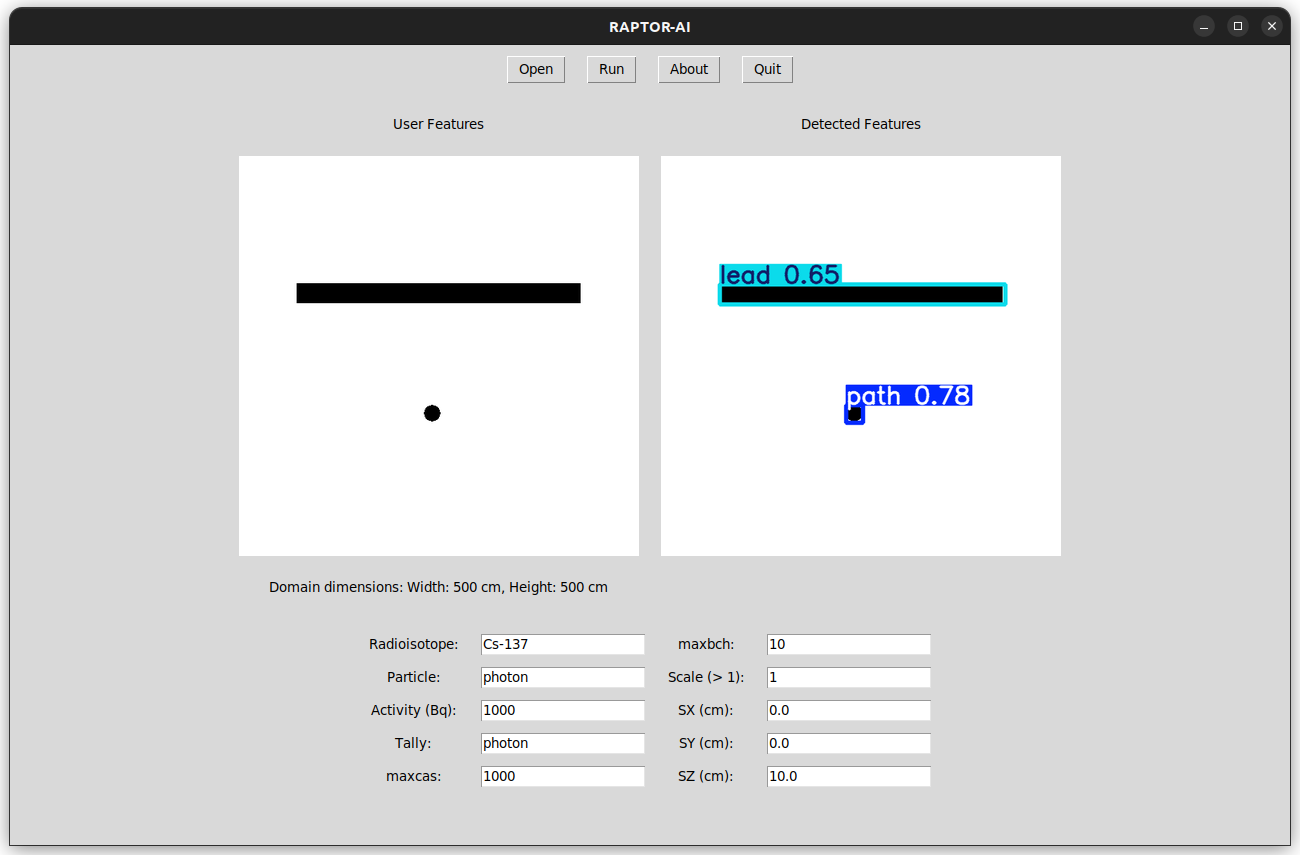
- RAPTOR-AI step 10 -- Once the image is loaded click on Run button, the entire model will start to run and you will see the detected features on the GUI as shown in Figure 17.
In the terminal users can check the progress of the run model (also check for errors and issues) and the program will automatically print information about the model run and its output, for our example 2D markup image will be as shown in Figure 18 below:

- RAPTOR-AI step 11 -- navigate to the working_dir in the main program directory. The generated PHITS script can be found under position_1 folder. The other files in this folder are gen_history.txt and run_pos.sh that are model run and script generation history and PHITS automatic run bash file, respectively (see Figure 19 below)
- RAPTOR-AI step 12 -- Now we will introduce the configuration files that users can use to further control the RAPTOR-AI model in a simple and intuitive manner. In the main program folder there are 2 configuration files named config.ini and model_loader.ini that can be used to control model's run parameters and trained model loading, respectively.
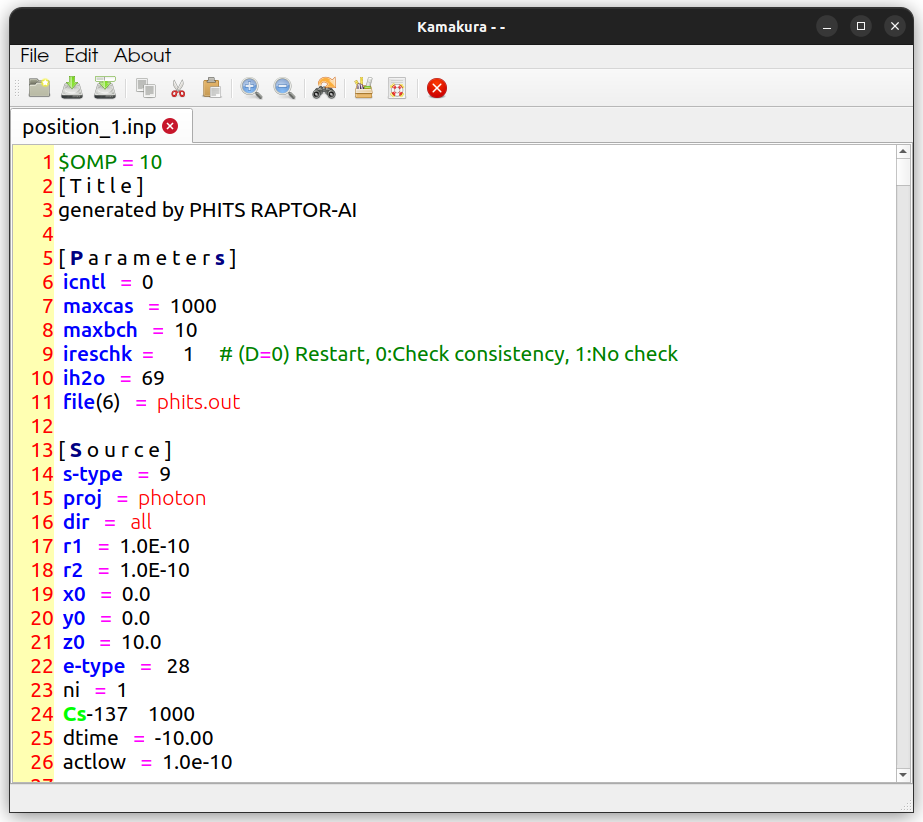
- RAPTOR-AI step 13 -- The content of config.ini file is as shown in Figure 21 below.
The definition of the parameters in config.ini are (users can change these parameters as they wish):
- rho1 = Lung density
- rho2 = Heart density
- rho3 = Blood density
- rho4 = Disc density
- rho5 = Vertebrae density
- rho6 = Vertebrae up density
- rho7 = Ribs density
- rho8 = Ribs(1-9) density
- rho9 = Soft tissue density
- rho10 = Skin density
- rho11 = Skull density
- rho12 = Brain density
- rho13 = Facial bone density
- rho14 = mat 6 skin density
- rho15 = Arm bone density
- rho16 = Leg bone density
- lead = lead shield material definition
- leadrho = density of the lead shield
- concrete = concrete shield material
- concreterho = density of the concrete shield
- pe = polyethylene shield material
- perho = density of the polyethylene shield
- custom = custom defined shield material
- customrho = density of the custom shield
- shieldHeight = shield height in cm
- icntl = icntl PHITS parameter (please refer to PHITS manual)
- ih2o = ih2o PHITS parameter (please refer to PHITS manual)
- dtime = dtime PHITS parameter (please refer to PHITS manual)
- actlow = actlow PHITS parameter (please refer to PHITS manual)
- mpi = mpi option -- 0 = off / 1 = on
- ncore = number of mpi cores
- outfile = outfile name
- runphits = run phits option -- 0 = off / 1 = on -- this runs PHITS automatically on the generated positions
- backup = backup tar.gz option -- 0 = off / 1 = on -- this creates a tar.gz backup of working_dir automatically
Please note that all densities are in unit of g/cm3. In addition, the material definition must follow ZZZAAA notation following the atomic or weight percent.
- RAPTOR-AI step 14 -- The content of model_loader.ini file is as shown in Figure 22 below.
The definition of the parameters in model_loader.ini are (users can change these parameters as they wish):
- modelname = the model name that must be located under trained_model folder. Users can downloaded our latest releases of trained models and check which model provides the best feature detection for their specific case.
- modelconfidence = the model confidence is the cutoff value for the confidence that can be employed to ensure certain features will only be detected that have equal or higher confidence level than that set here.
- RAPTOR-AI step 15 -- The content in the output folder in the main program directory contains the image with detected feature and intermediate files that will be used by the phantom generator model.
Examples
In this section two examples were provided that users can use to reproduce using their copy of RAPTOR-AI that helps them to familiarize with the present model:
Example 1:
Example 1 all files can be downloaded from hereThe following 2D markup image was created using GIMP (see Figure 1 below):
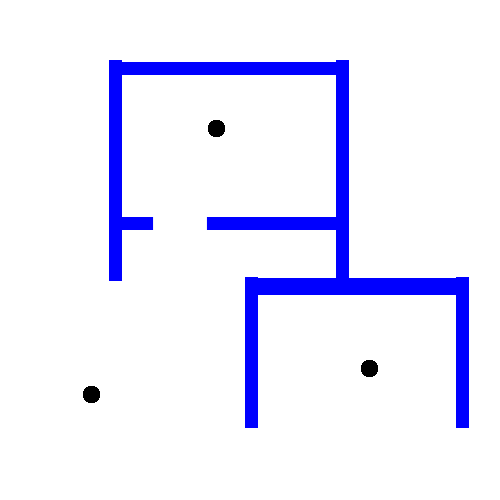
The image was uploaded into RAPTOR-AI and the model run was completed with detected features (see Figure 2 below):
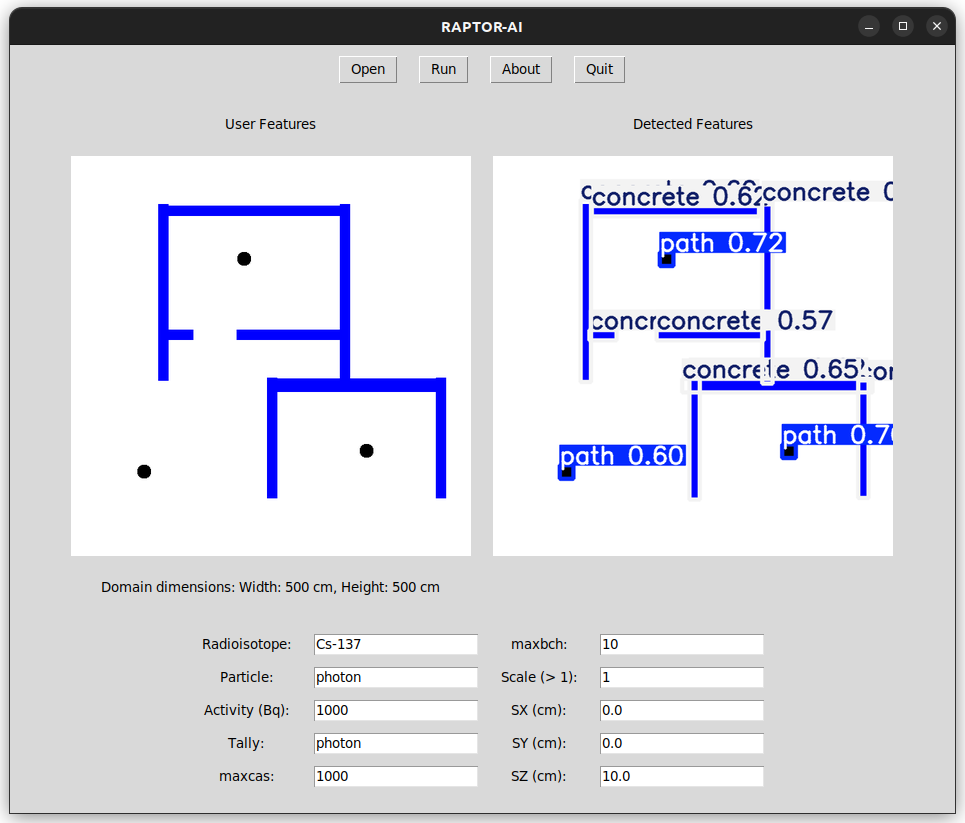
The terminal output during the model run can be seen in Figure 3 below. Please note that our RAPTOR-AI model has the ability to detect overlaps between slab shields and resolve them in the generated PHITS code script. :

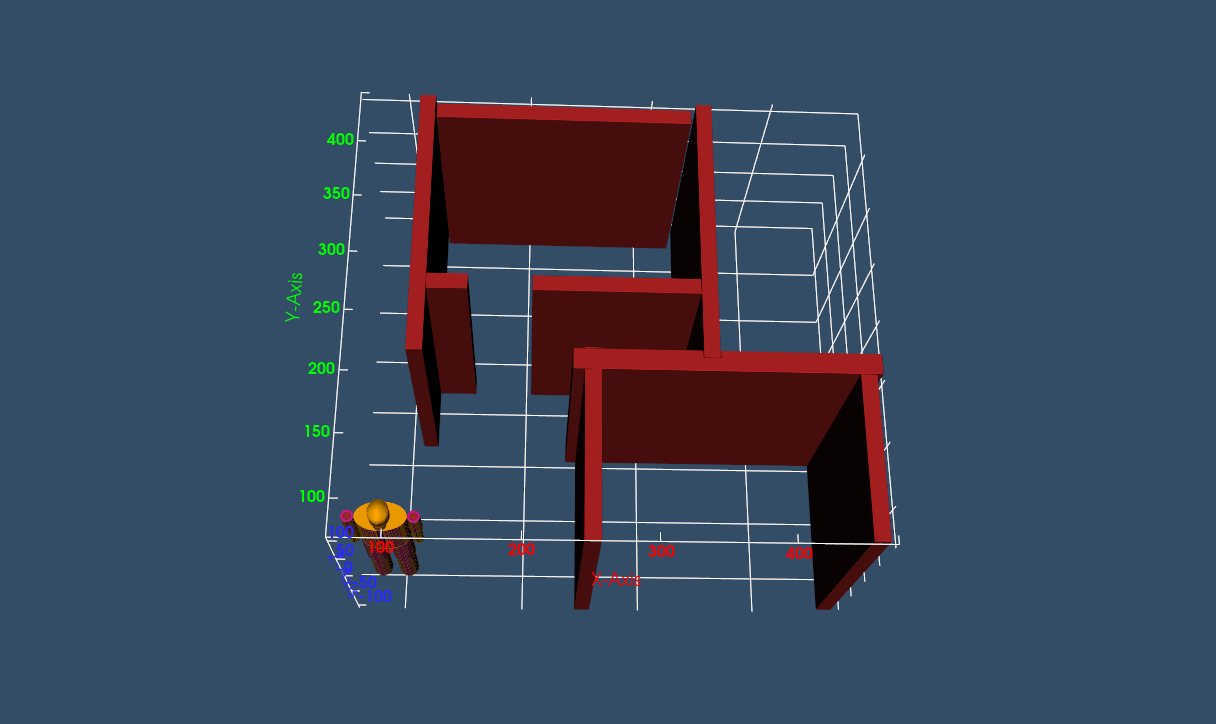
The final generated position 1 has been visualized by PHIG3D 3D viewer and can be seen in Figure 4 below:
Example 2:
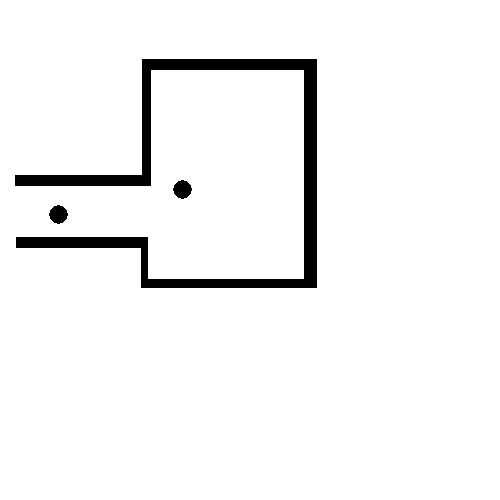
Example 2 all files can be downloaded from hereThe following 2D markup image was created using GIMP (see Figure 5 below):
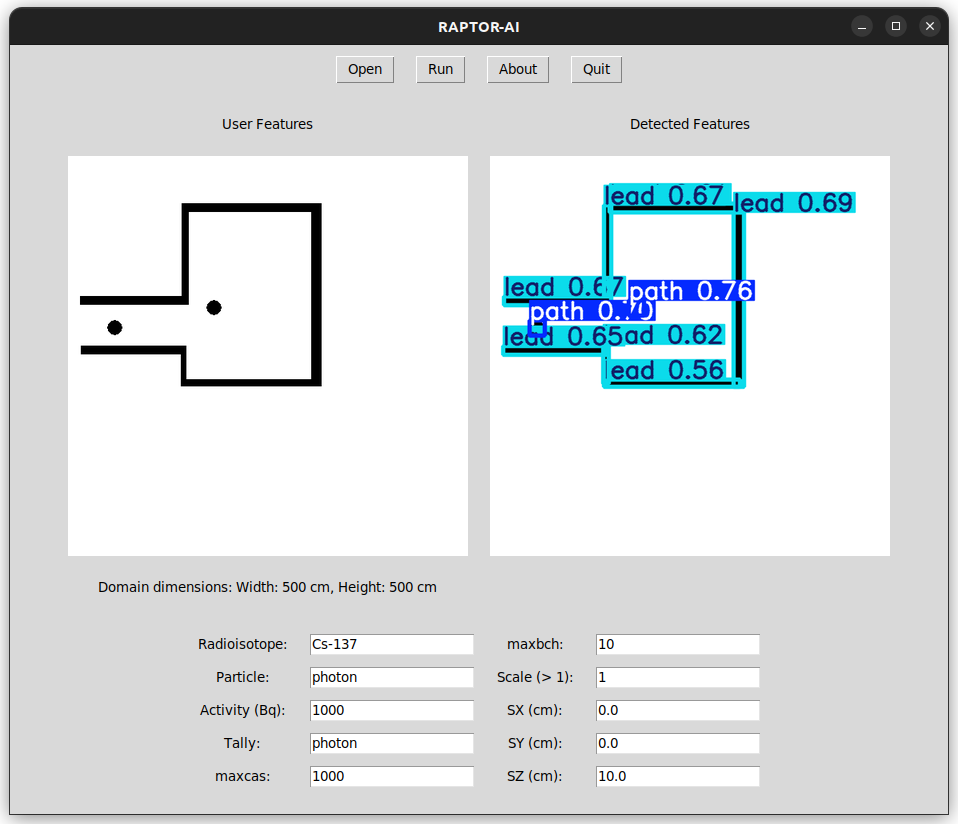
The image was uploaded into RAPTOR-AI and the model run was completed with detected features (see Figure 6 below):
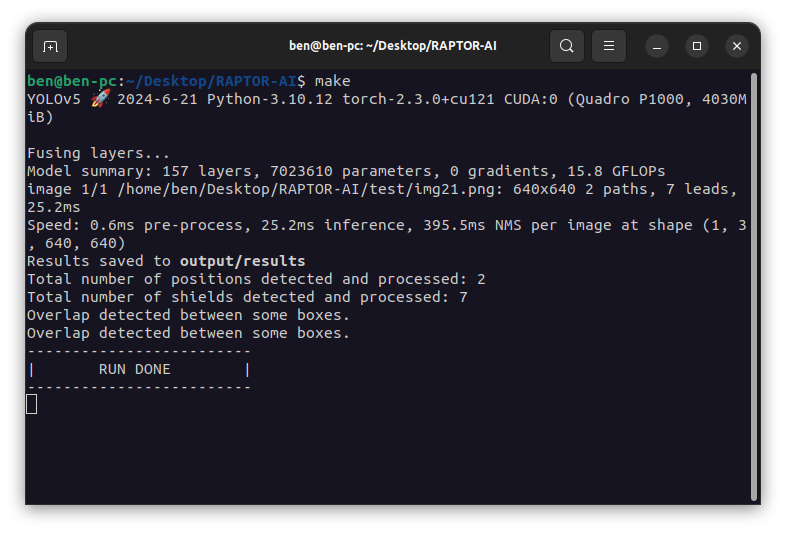
The terminal output during the model run can be seen in Figure 7 below. Please note that our RAPTOR-AI model has the ability to detect overlaps between slab shields and resolve them in the generated PHITS code script. :
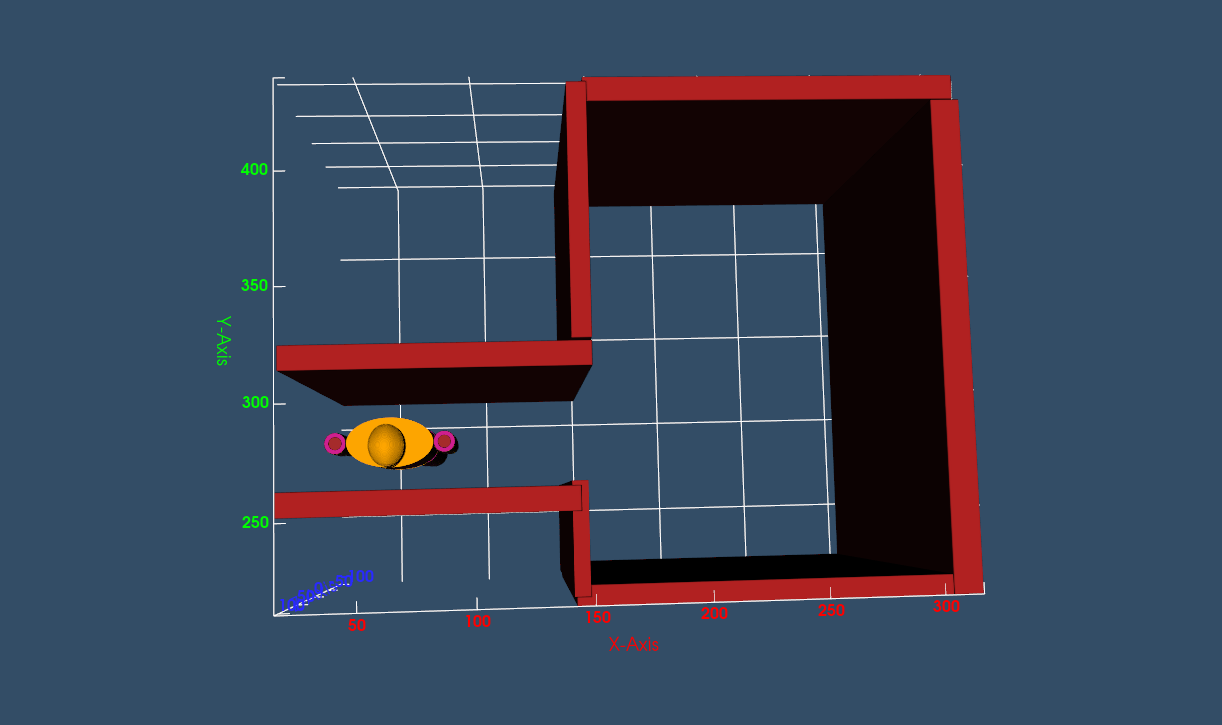
The final generated position 1 has been visualized by PHIG3D 3D viewer and can be seen in Figure 8 below:
Trained Models
In this section we will provide our trained models that users can download and use with their downloaded copy of RAPTOR-AI. These models must be placed under trained_model folder under main program directory. Also the model_loader.ini file must be set to read the desired downloaded model.
RAPTOR-AI model trained on 2024-07-25 can be downloaded from hereRAPTOR-AI model trained on 2024-08-05 can be downloaded from here
Please note that, you can download and check which of the trained models work best for your application. We always try to enhance our trained models by including cases with complex geometrical features.
Kamakura-- Code Editor
A lightweight and open-source code editor with syntax highlighting for PHITS package written in C++ and Qt by Mehrdad S. Beni and Hiroshi Watabe 2023.
A simplified and stripped-down version of the Kamakura multi-functional PHITS code editor, hence the "--" (minus minus)
- Open a PHITS script
- For syntax highlighting your files must have ".i" or ".inp" extension
- You can use ctrl+tab to move between different tabs
- You can search, replace
- You can drag and drop your files to the top bar for it to open automatically
- You can zoom in and out
- Make sure to save your changes!
Kamakura-- can be downloaded for both GNU/Linux and Windows from the following link.
Kamakura- - A lightweight PHITS code editor for Monte Carlo modellingKamakura-- github page link is as follow:
A simplified and stripped-down version of the Kamakura multi-functional PHITS code editor, hence the "--" (minus minus)Note to MCNP users: since many of PHITS commands and MCNP commands are similar, you can save your inputs as .inp or .i and use Kamakura-- to enjoy the syntax highlighting. It needs to also be noted that there might be few/some compatibility issues as well.
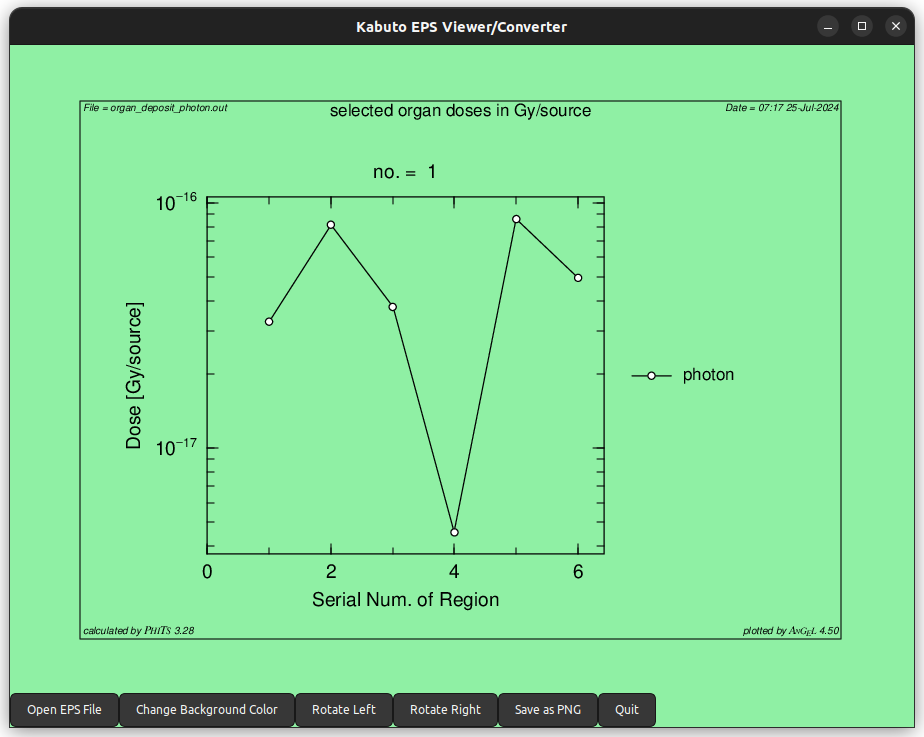
Kabuto Image Converter/Viewer
A simple EPS viewer and converter to PNG program based on C++ and GTK3. by Mehrdad S. Beni and Hiroshi Watabe 2024.
Kabuto github page link is as follow:
A simple EPS viewer and converter to PNG program based on C++ and GTK3
How to:
- Kabuto is only supported on GNU/Linux operating system
- run sudo apt install libgtk-3-dev to install the required libraries
- run make to compile the program from source
- run ./Kabuto to execute the program
Why only GNU/Linux
From the developers: We are using GNU/Linux operating system on our main systems daily. There are several reasons we do NOT use Windows or Mac, that are;
- Free and Open-Source: GNU/Linux is free (as in freedom) and open-source.
- Comprehensive Toolset: GNU/Linux provides all the necessary tools for our work.
- Familiarity: We have extensive experience working with GNU/Linux.
- Efficient Debugging and Maintenance: Debugging and maintaining our models is much easier on GNU/Linux.
- Customizability: GNU/Linux allows full customization of the development environment.
- Package Management: Efficient software management through powerful package managers.
- Scripting and Automation: Robust support for shell scripting and automation.
- Lightweight and Efficient: Ideal for older hardware with a fast, responsive environment.
- Security and Privacy: More secure with regular updates and strong user permissions.
- Cutting-Edge Tools: Early access to the latest development technology.
- Stability: Known for its stability, especially in long-term support versions.
- Support for Multiple Languages: Natively supports a wide range of programming languages.
- Community Support: Large, active, and supportive open-source community.
- Open Source Ecosystem: Developers can contribute to the tools they use.
- Native CLI: Offers better control with a powerful command-line interface.
- Virtualization and Containerization: Natively supports Docker, Kubernetes, and more.
- Networking and Server Management: Ideal for building and deploying web services.
For Microsoft Windows Users:
We recommend you to install virtualbox and install a simple to use GNU/Linux distro like Ubuntu 22.04 to use the tools that we have developed in an efficient manner. There are several useful tutorials on the web that can used to install a Ubuntu 22.04 virtual machine on your system.
At this time, we regret that we do not have the necessary time and resources to develop and maintain Windows versions of the tools we have created. We sincerely appreciate your understanding and patience.
Contact
Please feel free to contact the developers at:
ben.sh[at]tohoku.ac.jp -- change [at] to @
and/or
hwatabe[at]tohoku.ac.jp -- change [at] to @
RAPTOR-AI logo
RAPTOR-AI logo was designed based on the Ōgama or 大蝦蟇 or おおがま which translates to giant toad a form of Japanese Yōkai that are a class of supernatural entities and spirits in Japanese folklore.
Read more about Yōkai if you are interested.end